Water cap dimensions show the size and shape of the cap. The cap must fit the bottle neck. Bottle neck finishes are the design and threads at the top. You must match the cap and neck to keep your drink safe. This also helps stop leaks. Each part is important and adds value.
|
Feature |
Engineering Purpose |
Benefit |
|---|---|---|
|
Uses less material in the preform and cap. |
Costs less, weighs less, and is better for the environment. |
|
|
Specialized Thread Profile |
Made for strong thread grip with the cap. This keeps it from stripping or jumping under pressure. |
Gives the most safety and trust. Stops caps from popping off. |
|
Bore Seal (Inner Seal) |
The cap has a soft edge that presses inside the neck finish. This makes a tight, gas-proof seal. |
Traps CO₂ very well. This is the most important seal. |
|
Top Seal (Outer Seal) |
A second seal forms where the neck top meets a liner or ridge in the cap. |
Adds extra safety and stops leaks if the first seal fails. |
|
Tamper-Evident Band |
The breakaway band is built in. It shows if the bottle was opened. |
Keeps the product safe and helps buyers trust it. |
You should know PET bottles can let gas out if the cap or neck is not perfect. The bottle neck must handle pressure and not crack during shipping.
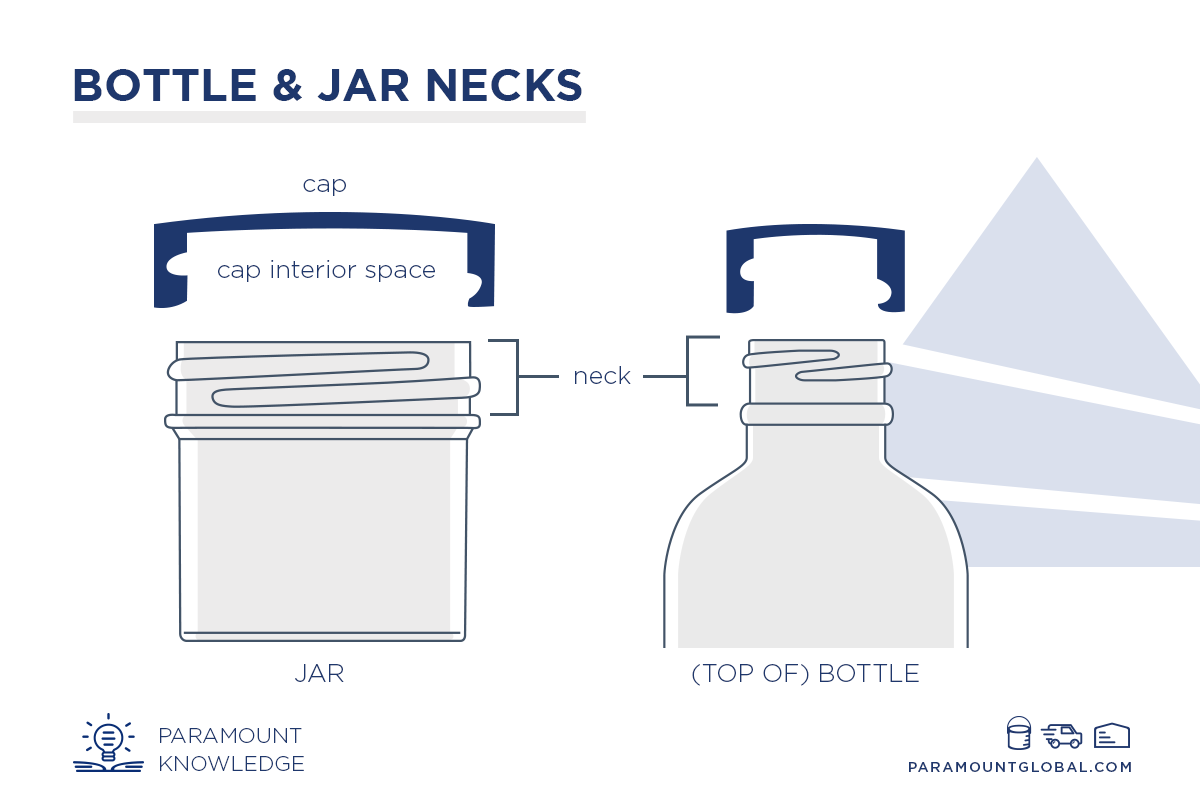
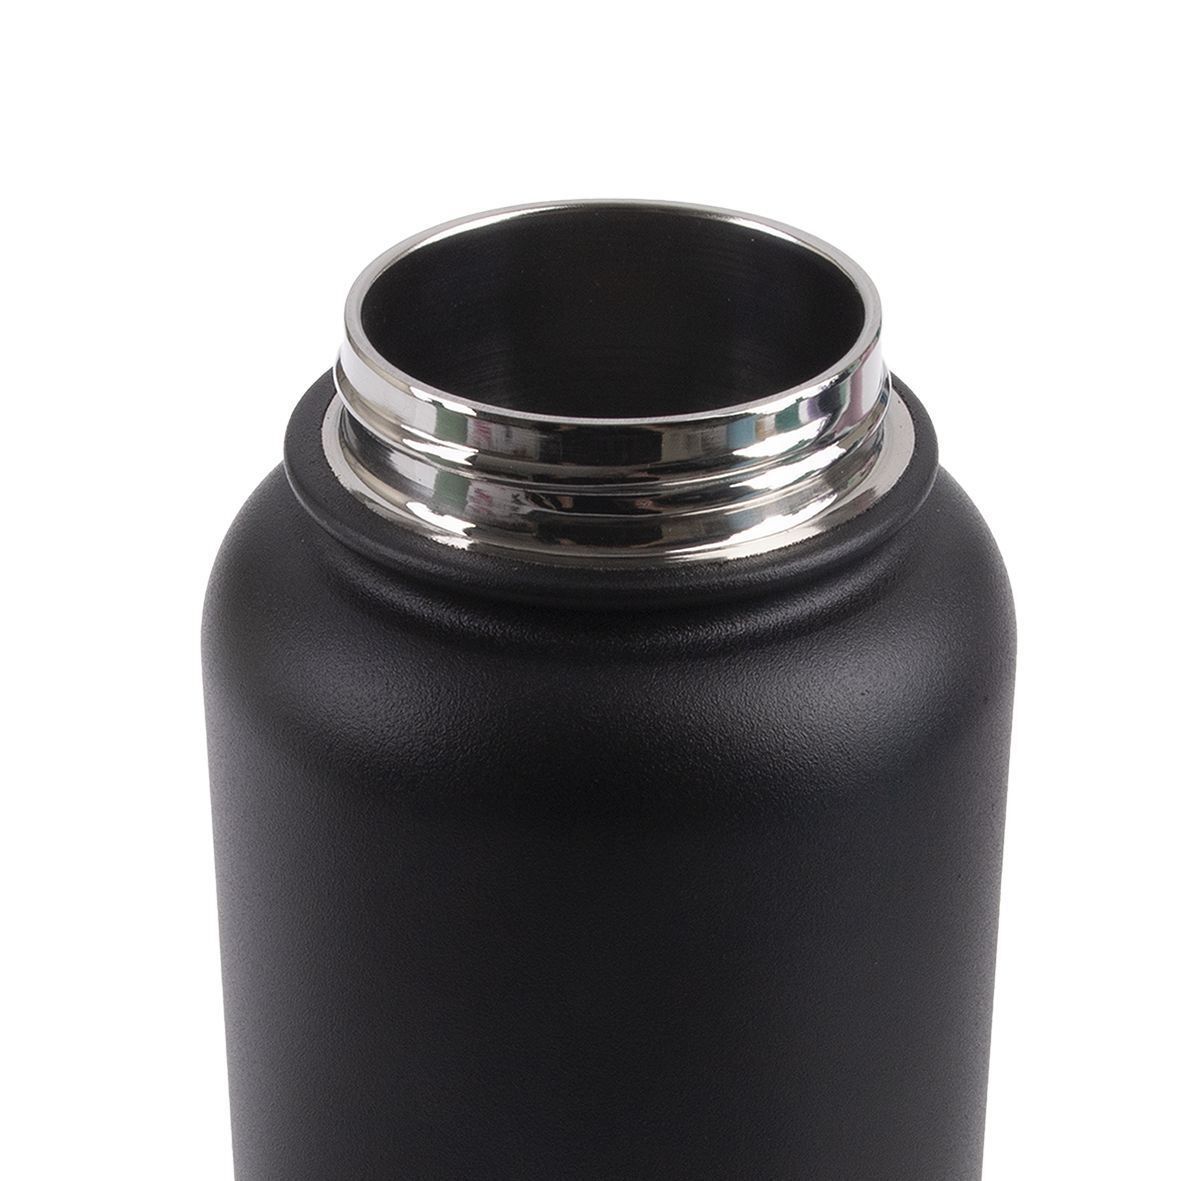
What is a Water bottle neck?
You see bottles all the time, but you might not notice the bottle neck. The bottle neck is at the top and holds the cap in place. This part is important because it keeps your drink safe and fresh. The shape and size of the bottle neck must fit the cap. If you want to learn about water cap dimensions, you should know the parts of the bottle neck.
The bottle neck has different measurements. These measurements help you choose the right cap. Packaging engineers use special words for these parts. Here is a table that shows the main measurements:
|
Dimension |
Description |
|---|---|
|
H |
Height of the bottle finish, measured from the sealing surface to the body of the container. |
|
I |
Diameter of the opening of the container measured from the inside wall to the inside wall. |
|
L |
Vertical distance from the sealing surface to the top part of neck bead. |
|
S |
Vertical distance from the sealing surface to the intersection of the finish wall and the first part of bottle thread. |
|
Finish |
Configuration of a container top shaped to accommodate a closure. |
|
Common Types |
Continuous thread finishes and standard finishes established by GPI and SPI. |
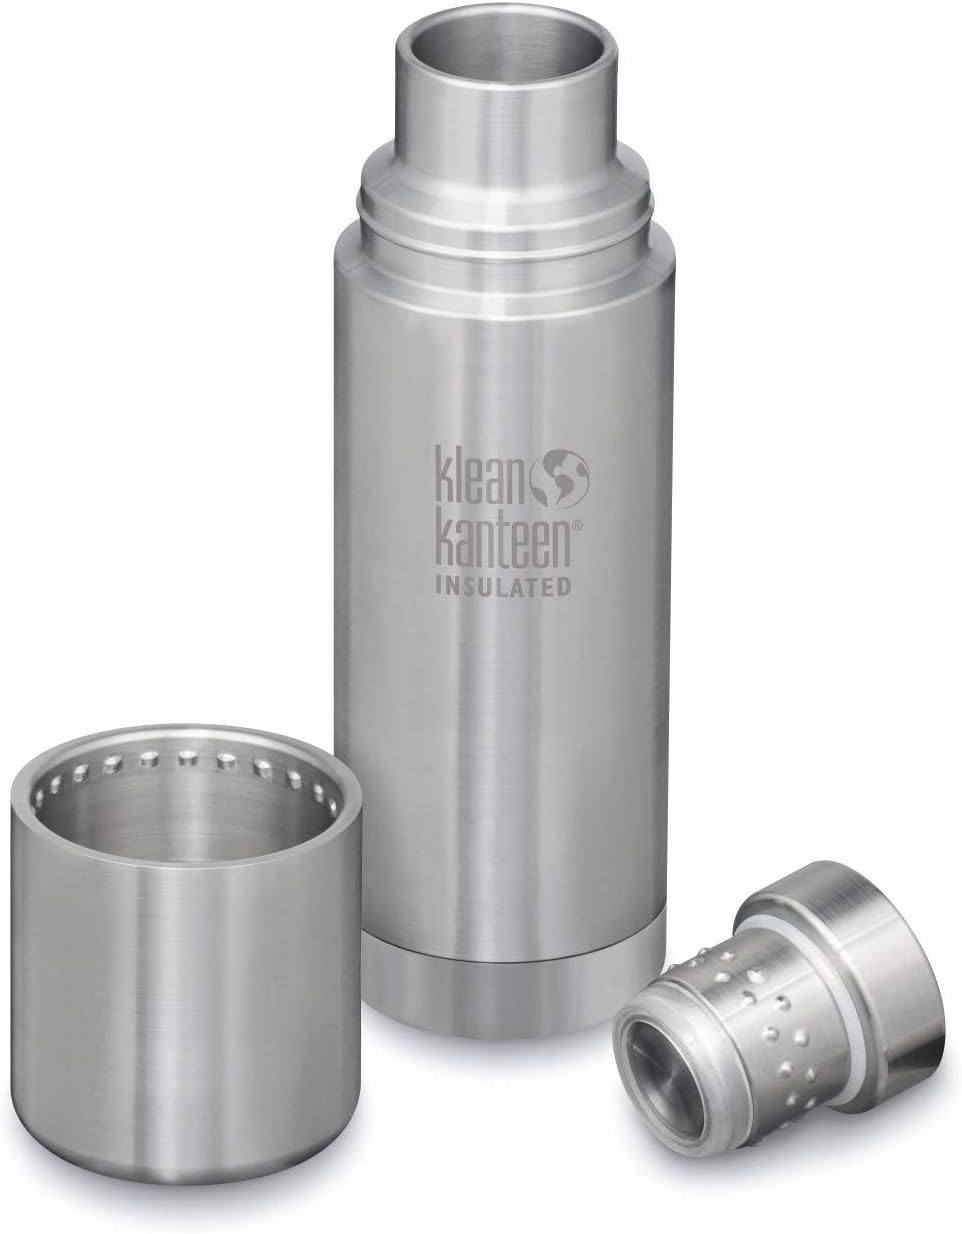
Bottle necks can be made from different materials. Most water bottles use plastics like PET or polypropylene. Some bottles use metals like steel or aluminum. These materials make the bottle strong and help it last longer. Here is a table that lists common materials:
|
Material Type |
Description |
|---|---|
|
Plastics |
Commonly used for bottle caps and inferred for necks. Includes PET, Polypropylene, LDPE, HDPE, PVC, Polystyrene, Polycarbonate. |
|
Metals |
Typically steel and aluminum, known for durability and temperature tolerance. |
Now you know the bottle neck is more than just the top. It connects the cap and keeps your drink safe. Knowing these facts helps you choose the best bottles and caps.
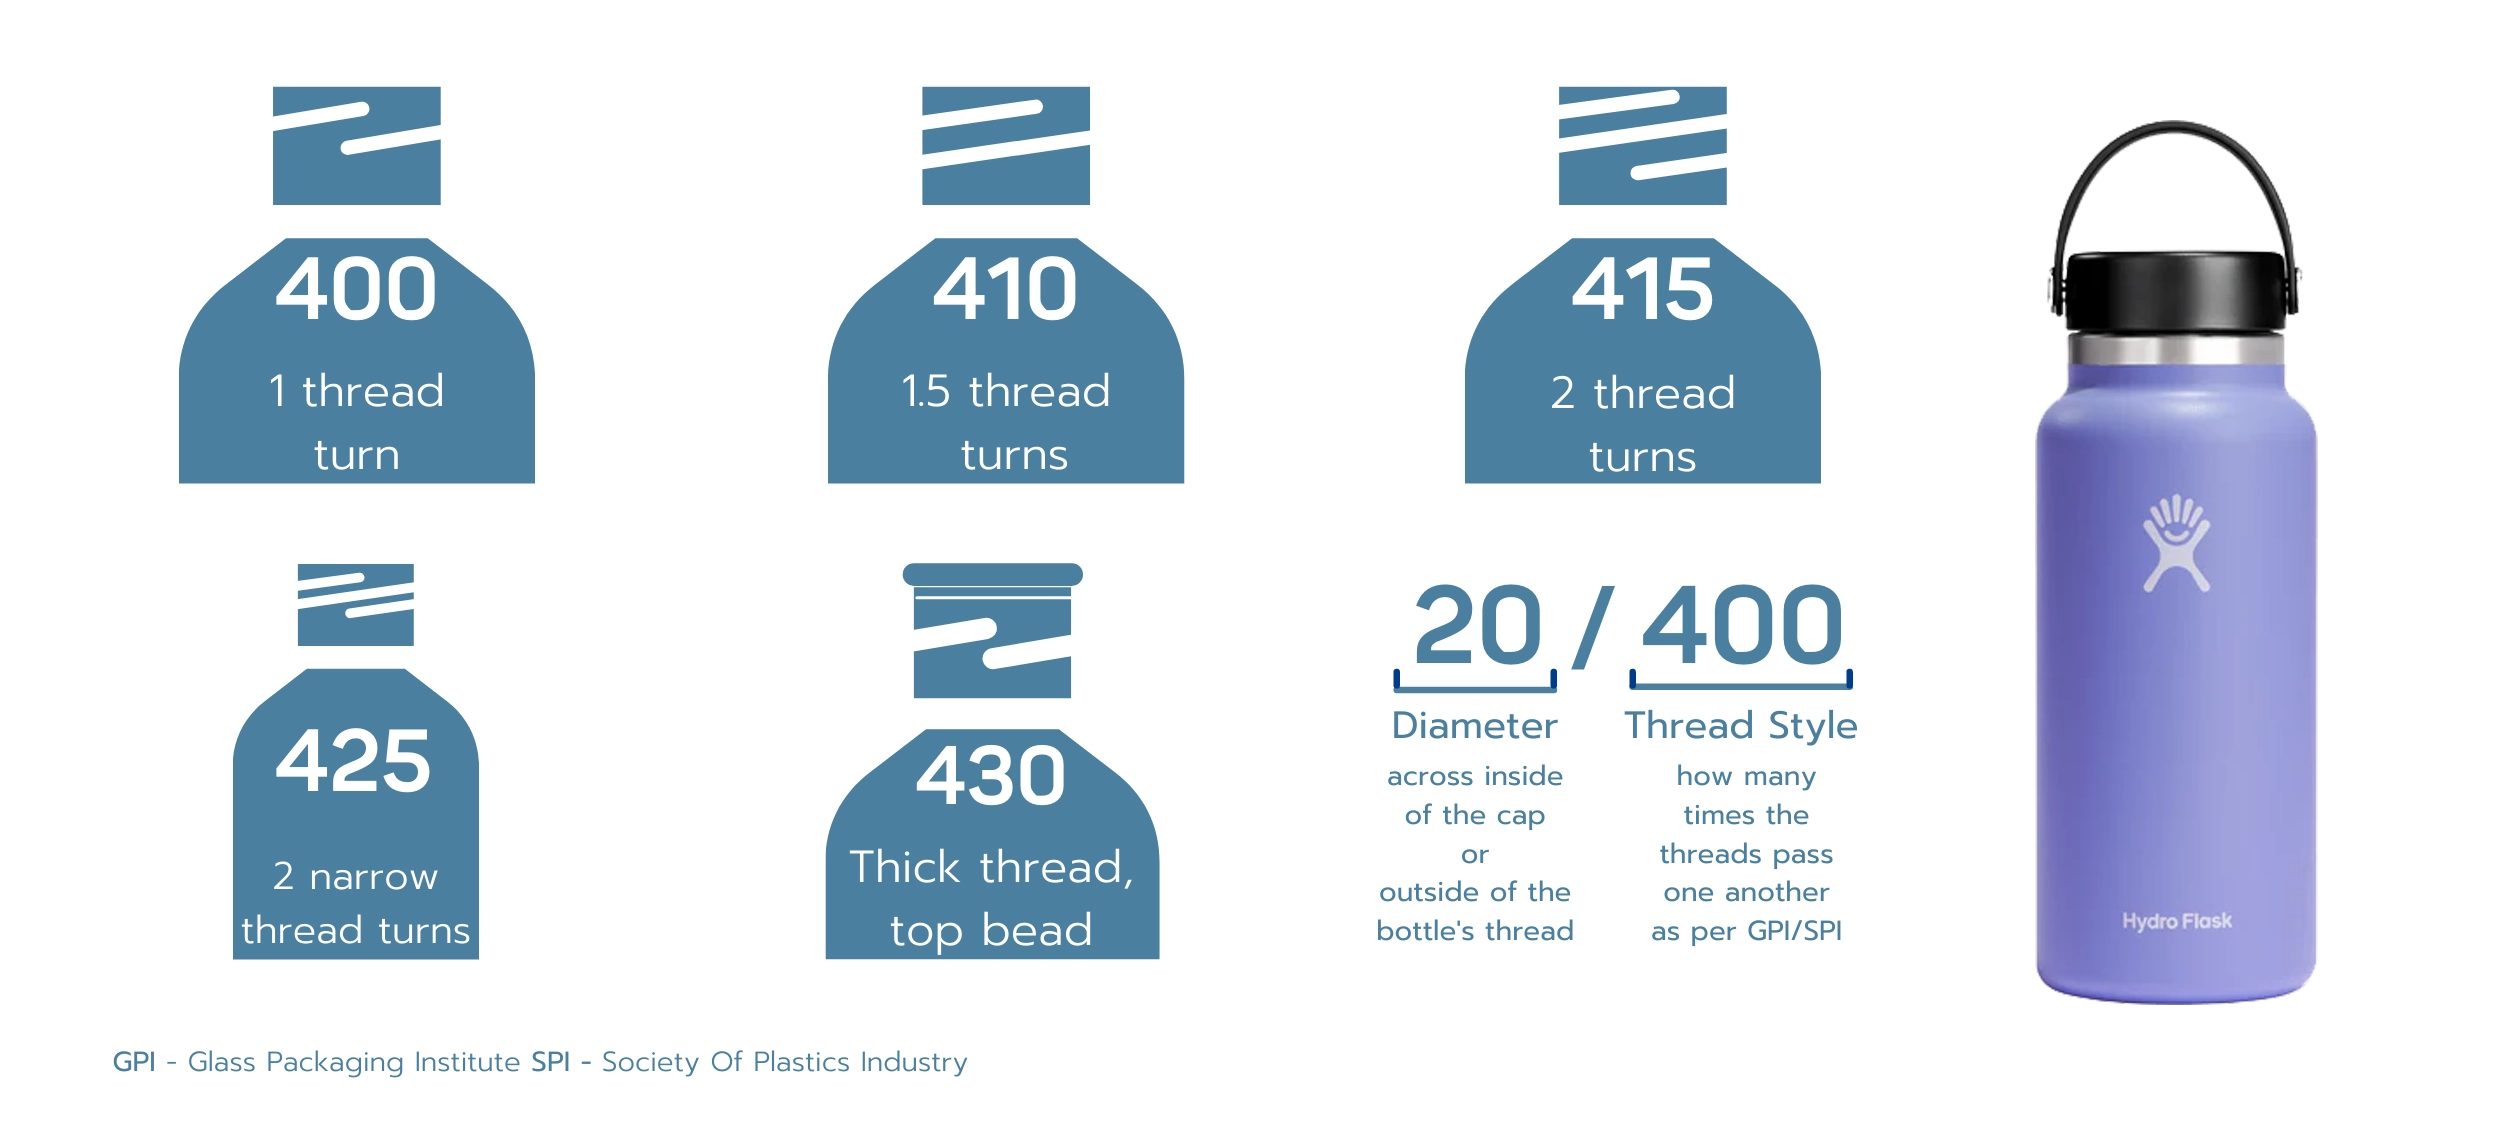
What does 60/400 Mean?
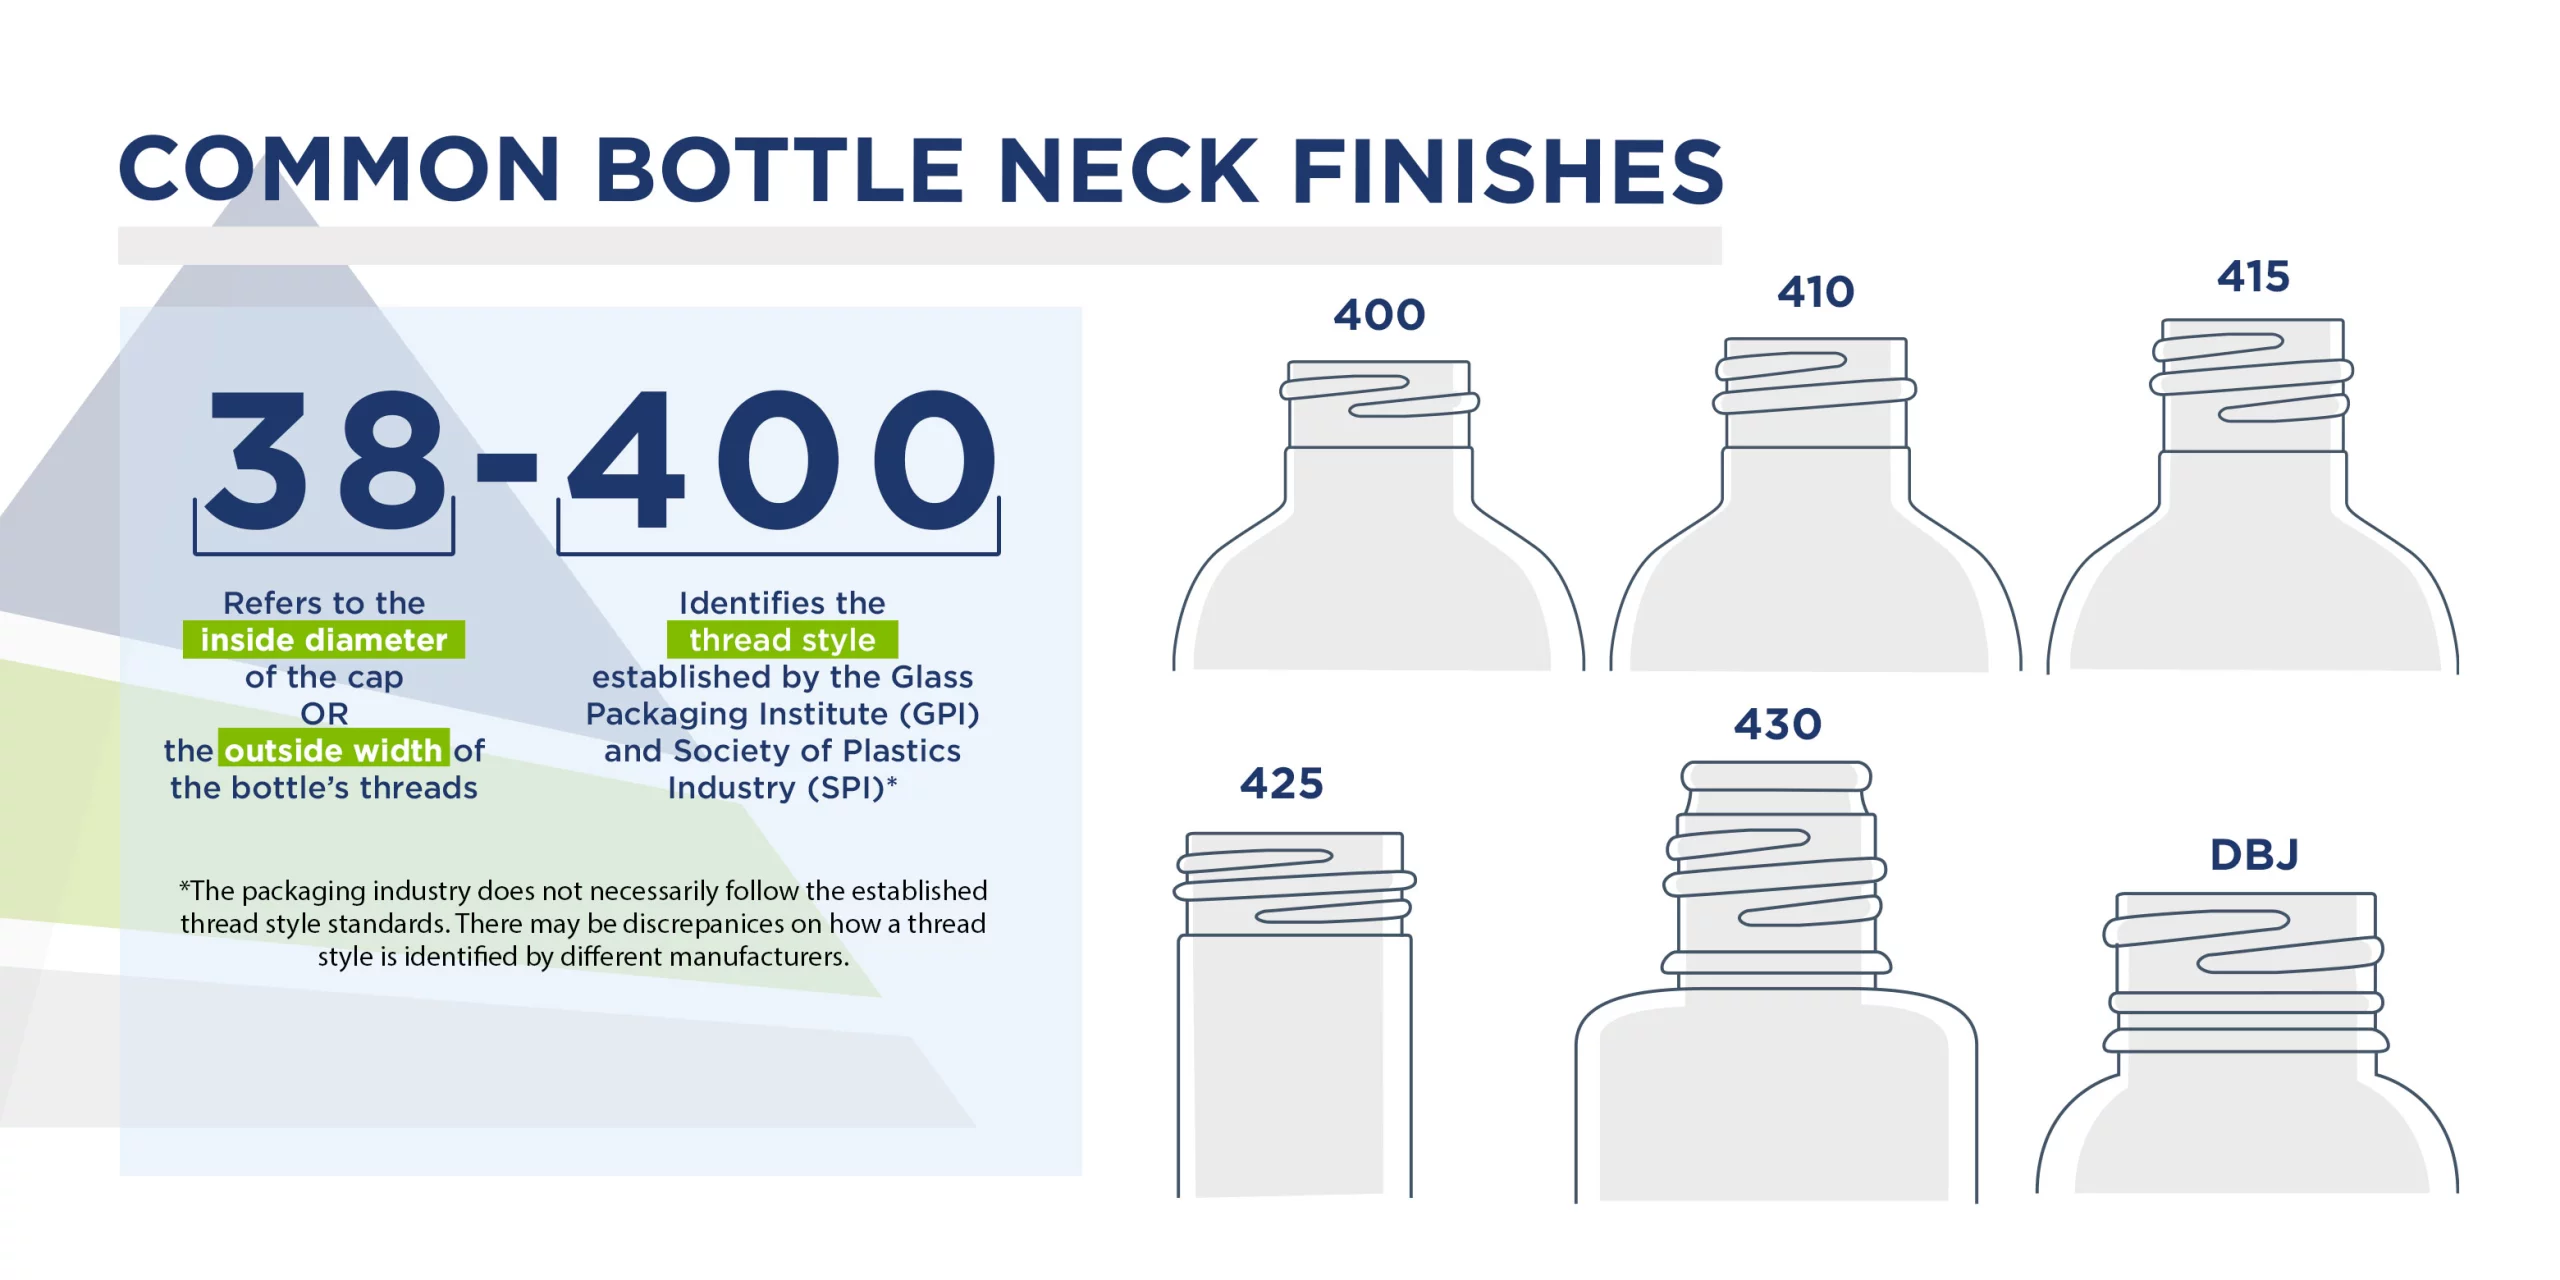
You might see codes like “60/400” when you look at water bottles or caps. This code helps you know if a cap will fit a bottle. You need to understand these numbers to make sure you choose the right parts.
The first number, “60,” shows the diameter of the bottle neck. You measure this from the outside of one thread to the outside of the opposite thread. The unit is millimeters. The second number, “400,” tells you about the thread style. It means the neck has one full turn of thread. This style is very common for water bottles.
Here is a table that breaks down the meaning of “60/400”:
|
Code |
Description |
|---|---|
|
60 |
Diameter in millimeters (outer thread to outer thread) |
|
400 |
Indicates 1 thread turn |
You can use this code to match caps and bottles. If your bottle says “60/400,” you need a cap with the same code. This helps you avoid leaks and keeps your drink safe.
Many companies use these codes to make sure their products work together. You will see “400” thread finishes on most water bottles in stores. This makes it easy to find replacement caps or design custom bottles.
If you want to measure a bottle neck, use a ruler or caliper. Measure across the threads for the diameter. Count the turns for the thread style. Write down the code so you can order the right cap.
Knowing what “60/400” means helps you choose bottles and caps that fit perfectly. You keep your drinks fresh and safe. You also save time and money by avoiding mistakes.
What is a Water bottle neck finish?
When you look at a water bottle, you see the top part where the cap twists on. This area is called the bottle neck finish. The neck finish is the special shape and thread design at the top of the bottle neck. It helps you match the right cap to the right bottle. If you want to avoid leaks and keep your drink safe, you need to pay attention to neck finishes.
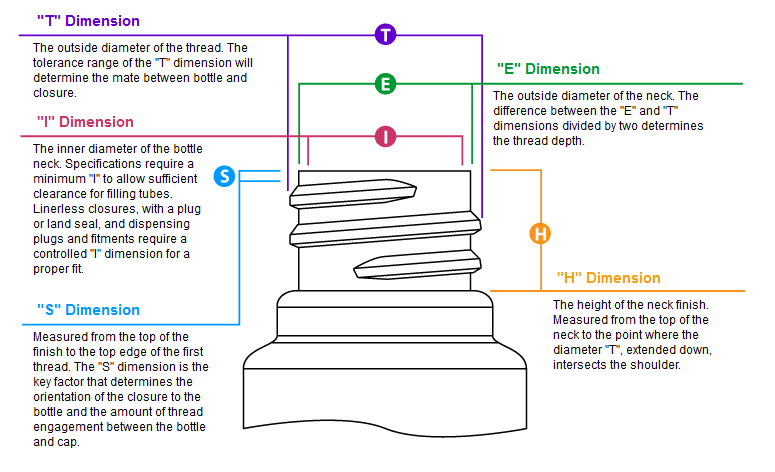
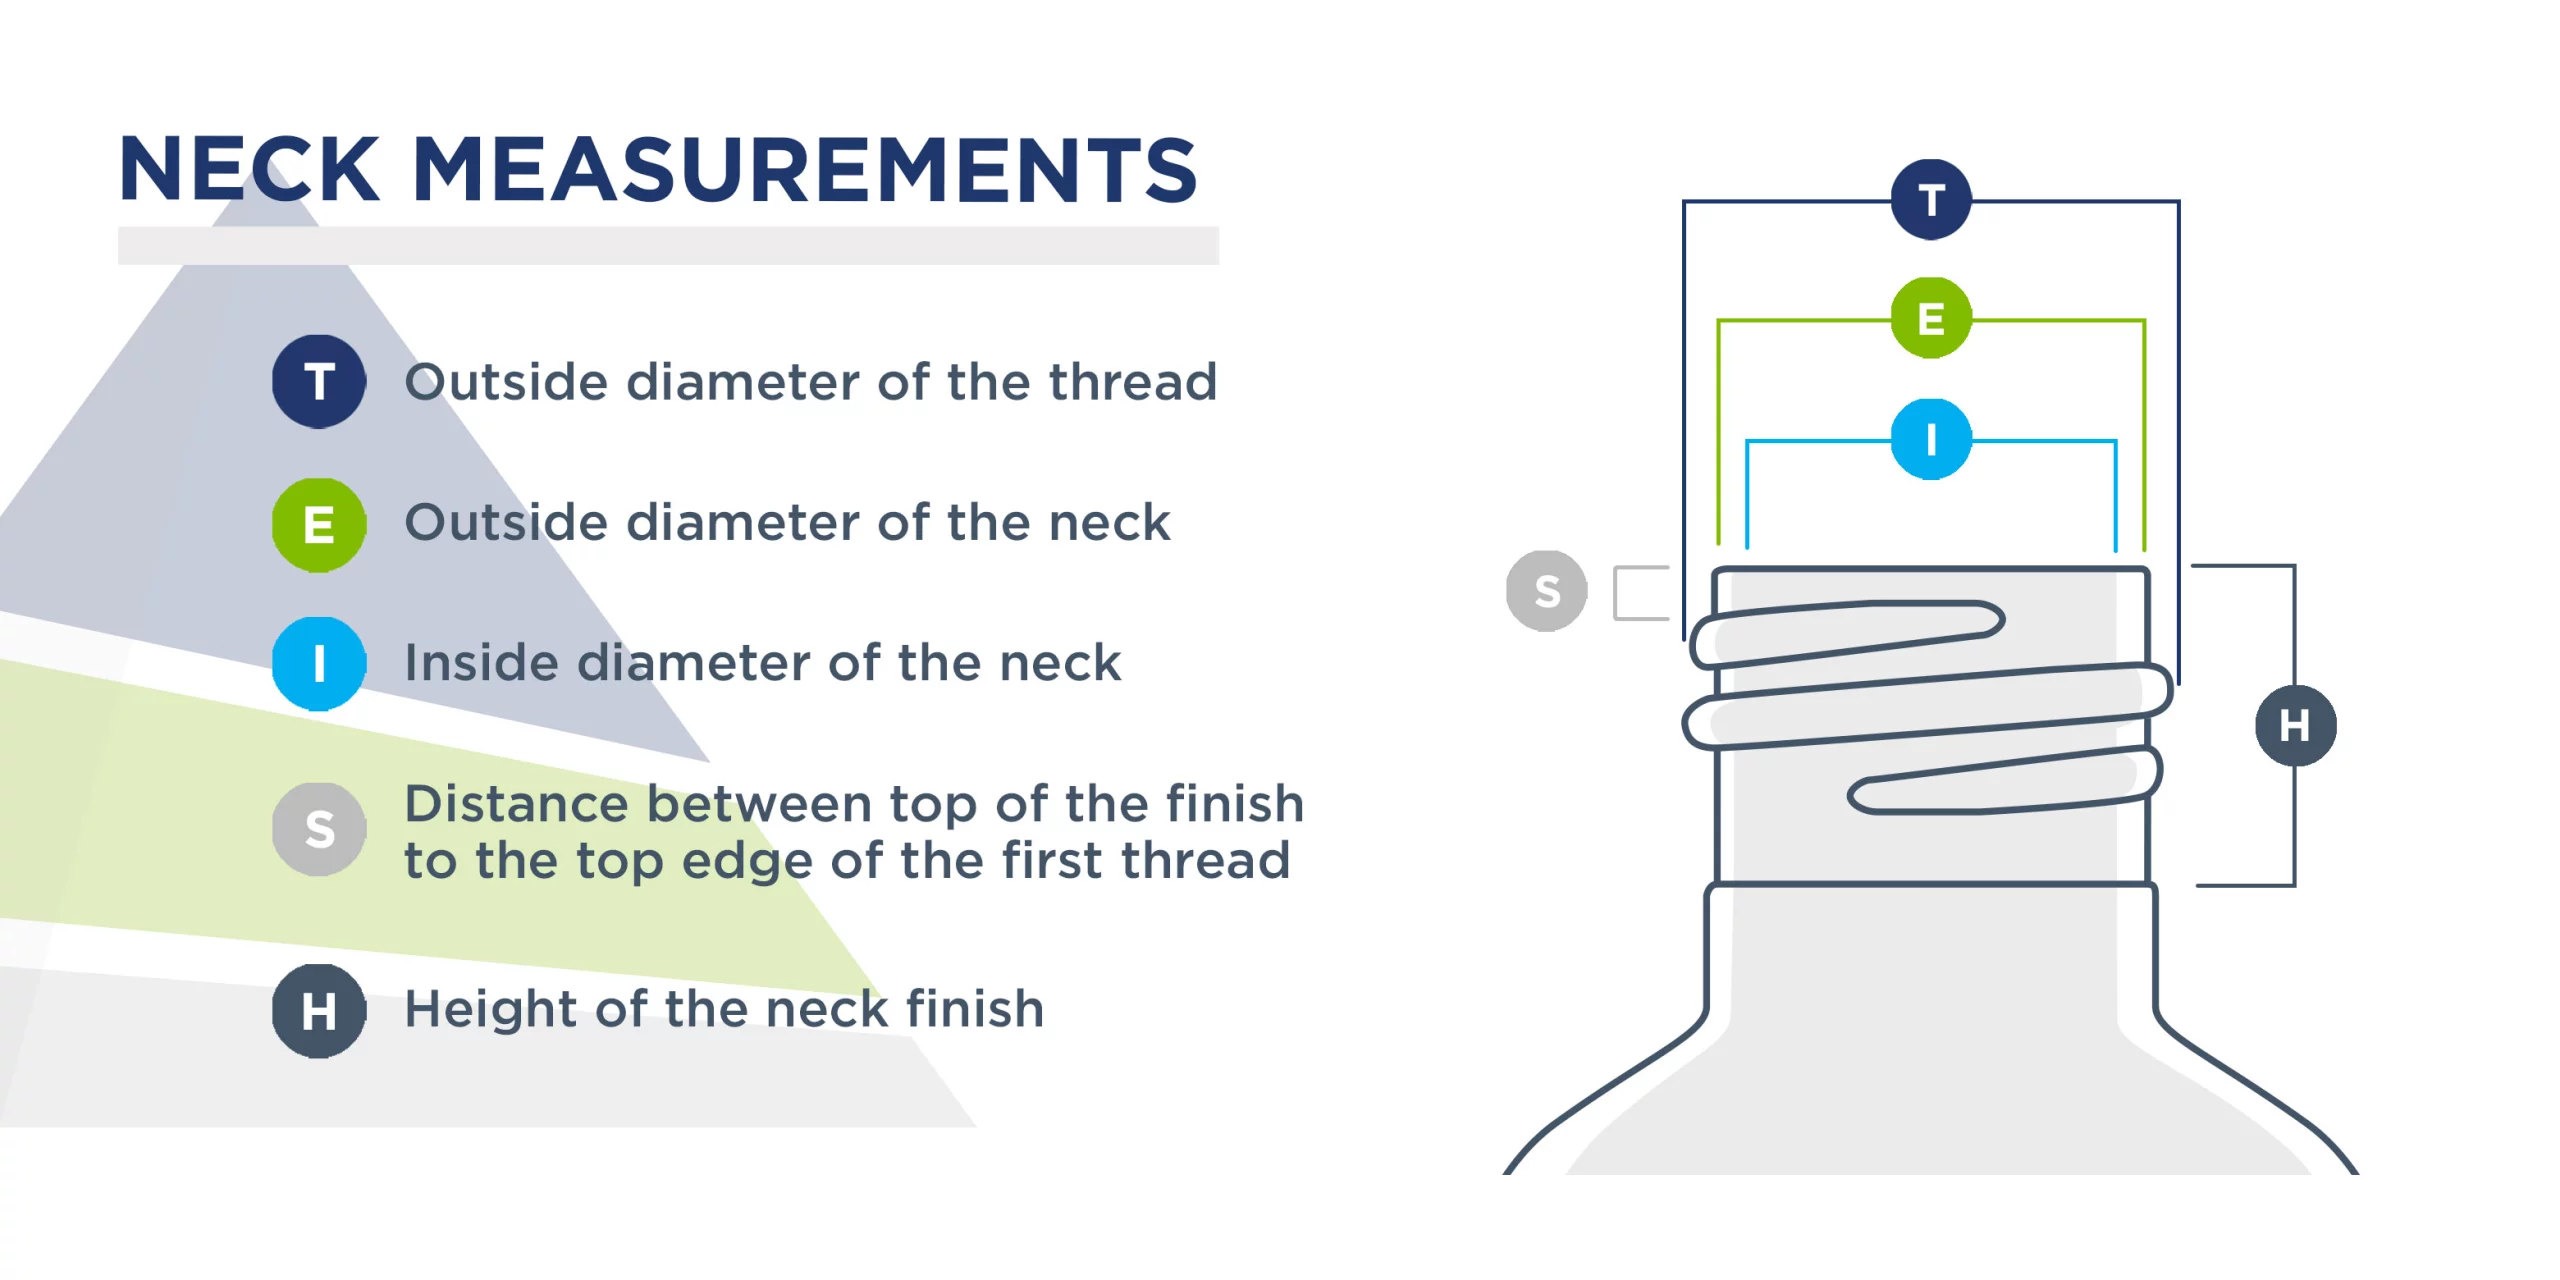
The neck finish has several important measurements. These measurements help you find the perfect fit between the bottle and the cap. You can see the main features in the table below:
|
Dimension |
Description |
|---|---|
|
T |
Measures the outer diameter of the thread. This is crucial for matching closures. |
|
E |
Measures the outer diameter of the neck. It helps determine thread depth. |
|
I |
Measures the inner diameter of the neck. This is essential for filling tube clearance. |
|
S |
Measures from the top of the finish to the first thread. This is important for closure orientation. |
|
H |
Height of the neck finish, from the top of the neck to where it meets the shoulder. |
Each of these dimensions affects how the cap fits and seals. For example, the T dimension tells you if the cap will screw on tightly. The E and I dimensions help you know if the cap will sit straight and seal well. The S and H measurements make sure the cap lines up with the threads and covers the neck finish completely.
Different neck finishes use different thread styles. Some bottles have continuous threads that wrap around the neck without breaks. Others use special designs like tamper-evident bands. You might see codes like 400, 410, or DBJ. These codes tell you the type of thread and how many turns it makes around the neck.
If you want to choose the right water cap dimensions, always check the bottle neck finish first. This step helps you avoid problems and keeps your drink fresh. You can use a ruler or caliper to measure the neck and compare it to standard codes. When you understand neck finishes, you make better choices for bottles and caps.
How to Measure a Water Bottle’s Neck Finish?
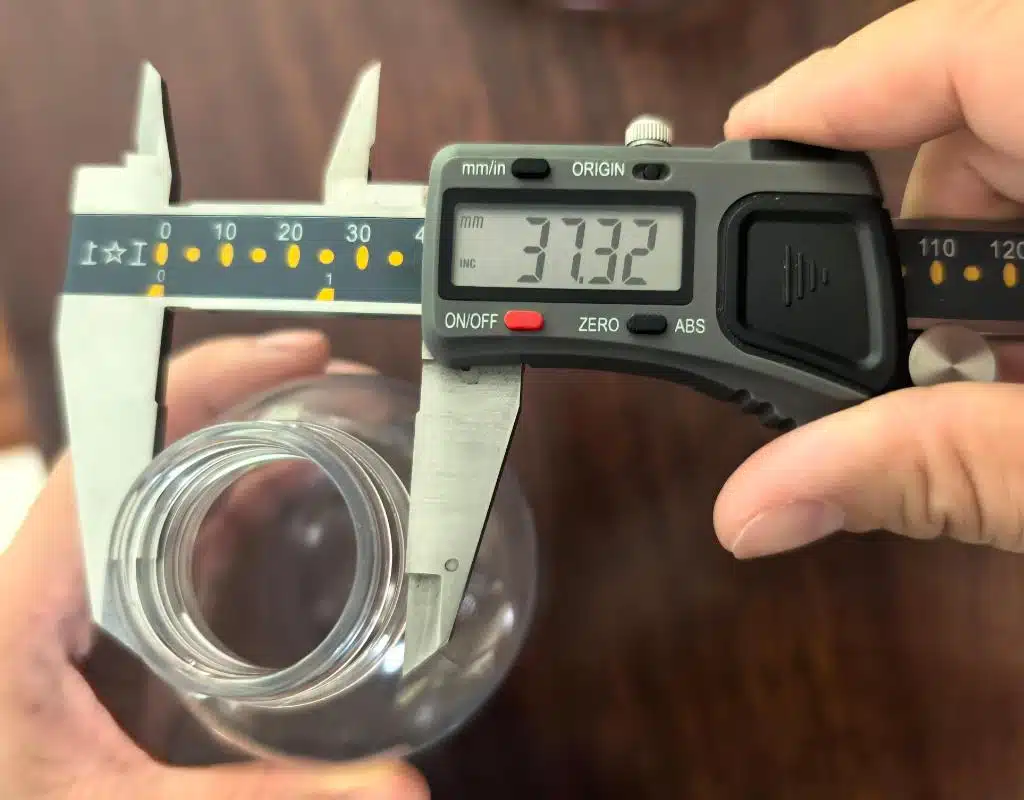
Measuring a neck finish helps you find the right water cap dimensions for your bottle. You need to match the cap and bottle neck finishes to keep your drink safe and prevent leaks. When you measure a bottle neck, you check the size and shape at the top of the bottle. This process uses simple tools and clear steps.
You can use a measuring gauge or a caliper to get accurate results. These tools help you find the diameter and thread style. The diameter tells you how wide the neck is, and the thread style shows how the cap twists onto the bottle. Most bottles use standard neck finishes like 400 or 415.
Follow these steps to measure a neck finish:
-
Measure the diameter of the inside of the cap. Place your gauge or caliper from one inner wall to the opposite side.
-
For the bottle, measure the outside diameter of the threads. This gives you the “T” dimension.
-
Count the number of thread turns on the bottle neck. This helps you know the finish style. For example, one full turn means a 400 finish.
-
Write down the measurements. Compare them to standard codes to find the right cap.
Here is a table that shows common technical dimensions:
|
Dimension |
What It Means |
|---|---|
|
T |
Outside diameter of threads |
|
H |
Height of the neck finish |
|
E |
Outside diameter of neck |
|
S |
Distance from top to first thread |
|
C |
Diameter below the finish |
When you measure neck finishes, you make sure your bottle and cap work together. You protect your drink and make your packaging safe.
Continuous Thread Finishes
You see continuous thread finishes on many water bottles. These finishes use a threaded neck design. The threads wrap around the neck in a spiral. You twist the cap onto the bottle, and the threads help seal it tightly. This design lets you open and close the bottle many times without losing the seal.
Continuous thread finishes work with many types of closures. You can use screw caps, flip tops, or even dispensing caps. The finish makes it easy to reseal your bottle after each use. You keep your drink fresh and safe. Most water bottles in stores use this style because it is simple and reliable.
You find continuous thread finishes in many sizes. The neck diameter can range from 15mm to 120mm. This wide range means you can match bottles with different cap sizes. You need to check the neck diameter before you choose a cap. If you pick the wrong size, the cap will not fit or seal well.
Here are some reasons why continuous thread finishes are popular:
-
You get a secure seal every time you close the bottle.
-
You can open and reseal the bottle easily.
-
You find many cap styles that fit this finish.
-
You reduce the risk of leaks and spills.
Continuous thread finishes make packaging simple. You do not need special tools to open or close the bottle. You just twist the cap on or off. This design works well for water, juice, and other drinks. You can trust it to keep your beverage safe.
Non-Continuous Thread Finishes
You may notice that not all bottle necks use a spiral thread. Some bottles use non-continuous thread finishes. These finishes do not have a full spiral around the neck. You see them in bottles that need special caps or extra security.
Non-continuous thread finishes often use snap-on or press-on caps. You do not twist these caps to open or close the bottle. You push the cap down, and it locks into place. This design works well for tamper-evident bottles, sports drinks, and some juice bottles.
Here are some common types of non-continuous thread finishes:
-
Snap-On Finish: You press the cap onto the neck. The cap snaps into a groove and stays secure.
-
Crimp Finish: You use a machine to crimp the cap onto the neck. This finish is common for metal bottles.
-
Lug Finish: You twist the cap a short distance. The cap locks onto small lugs or bumps on the neck.
|
Finish Type |
How It Works |
Common Use Cases |
|---|---|---|
|
Snap-On |
Cap snaps into groove |
Juice, milk, sports drinks |
|
Crimp |
Cap crimped by machine |
Metal bottles, glass jars |
|
Lug |
Cap twists onto lugs |
Jars, specialty bottles |
You find these finishes useful when you need a quick seal or want to show if someone opened the bottle. You also see them in bottles that need to be opened by machines, not by hand. Non-continuous thread finishes give you more options for packaging and safety.
When you select a bottle, always check the neck finish. You make sure the cap matches the finish. You keep your drink safe and prevent leaks. Non-continuous thread finishes help you meet special needs in packaging.
Neck Finishes of Best-Selling Water Bottles
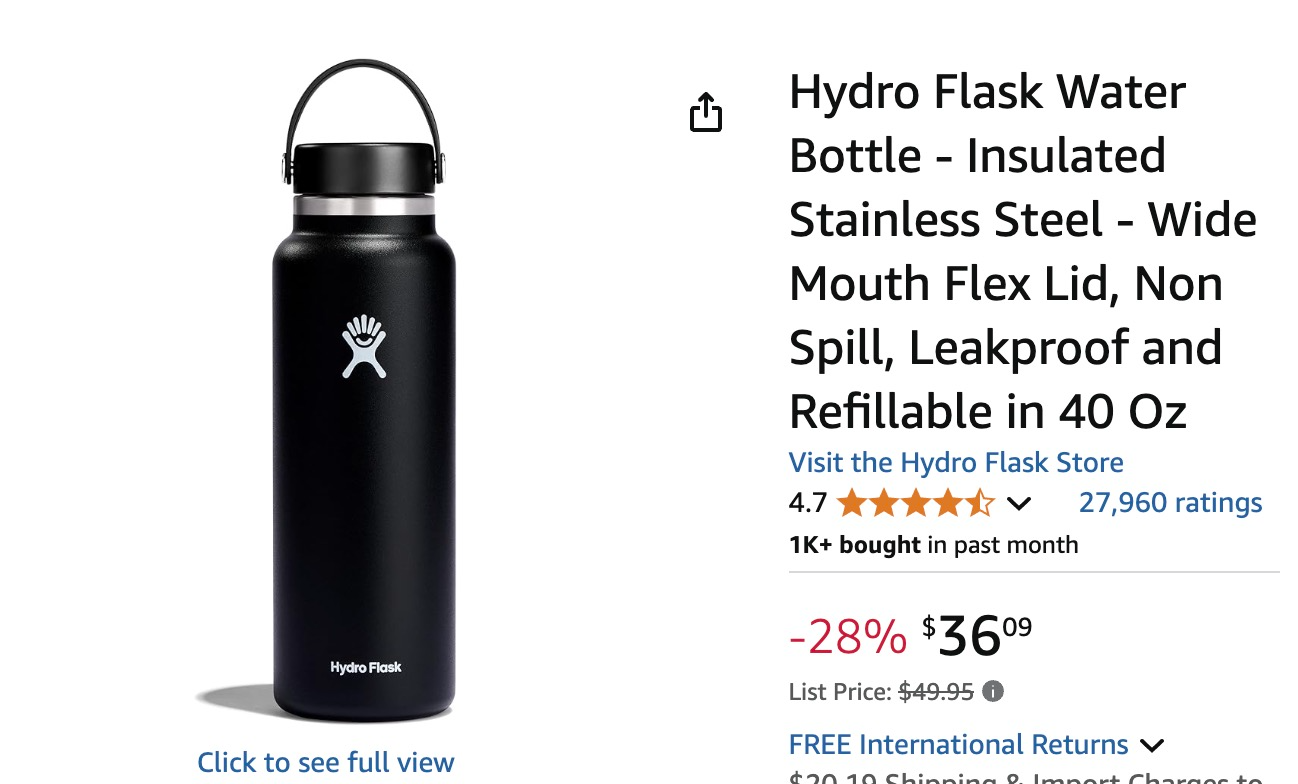
When you look at popular water bottles, you notice that the neck finishes play a big role in how well the cap fits. You want a bottle that seals tightly and opens easily. Many best-selling bottles use standard neck finishes to make sure you get a reliable seal every time.
You see the Clear PET Round Sauce Bottle in many stores. This bottle uses a 38-400 neck finish. The design lets you use different types of caps, such as flat caps or flip caps. You can install and remove these caps without trouble. The neck finish makes the bottle easy to use and helps prevent leaks.
Here are some features you find in the neck finishes of top-selling bottles:
-
You get compatibility with many standard caps.
-
You can open and close the bottle quickly.
-
You see a design that helps keep your drink safe.
-
You find neck finishes that work with both plastic and metal bottles.
|
Bottle Name |
Neck Finish |
Cap Compatibility |
Usability Features |
|---|---|---|---|
|
Clear PET Round Sauce Bottle |
38-400 |
Flat, flip, dispensing |
Easy install, leak-proof |
|
Stainless Steel Sports Bottle |
Custom |
Screw-on, snap-on |
Durable, secure seal |
|
Classic Water Bottle |
28-410 |
Standard screw cap |
Simple twist, tight seal |
Tip: If you want a bottle that works with many caps, choose one with a standard neck finish like 38-400 or 28-410.
You see that neck finishes help you match the right cap to your bottle. You avoid leaks and keep your drink fresh. When you pick a bottle, check the neck finish to make sure it fits your needs.
Bottle Neck Thread Standards
You may wonder why some bottles seal better than others. The answer often comes from the thread standards used on the neck. These standards help you match the right cap to your bottle. They also make sure you get a tight seal every time.
Many manufacturers follow international guidelines for bottle neck threads. These guidelines help keep products safe and easy to use. For example, the EN 16592 standard is common in Europe. It uses a PET finish 29/25 with a buttress thread at a 20° angle. You can see more details in the table below:
|
Standard Name |
Thread Type |
Thread Pitch |
Diameter |
Threadform |
Nose Radius |
Fillet Radius |
|---|---|---|---|---|---|---|
|
EN 16592 |
PET finish 29/25 |
2.17mm |
29.4mm |
Buttress thread at 20° |
0.25mm |
0.4mm |
You will also find other thread types like SP400, SP410, and SP415. These threads work well for PET bottles. They allow you to close and open the bottle easily. Most of these threads have similar shapes and sizes, so you can use many types of caps.
Bottle neck thread standards can change depending on where you live. Here is a table that shows some common regional standards:
|
Thread Standard |
Thread Shape |
Sealing Method |
Common Regions |
|---|---|---|---|
|
NPT |
Tapered |
Thread deformation + sealant |
North America |
|
BSPT |
Tapered |
Thread deformation + sealant |
Europe, Asia, International |
|
BSPP |
Parallel |
Gasket or O-ring |
Europe, Asia, International |
-
Bottle threads do not always follow strict rules, but most companies use recommended guidelines.
-
You will see that these standards help you find the right fit for your bottle and cap.
Tip: Always check the thread standard before you choose a cap. This step helps you avoid leaks and keeps your drink safe.
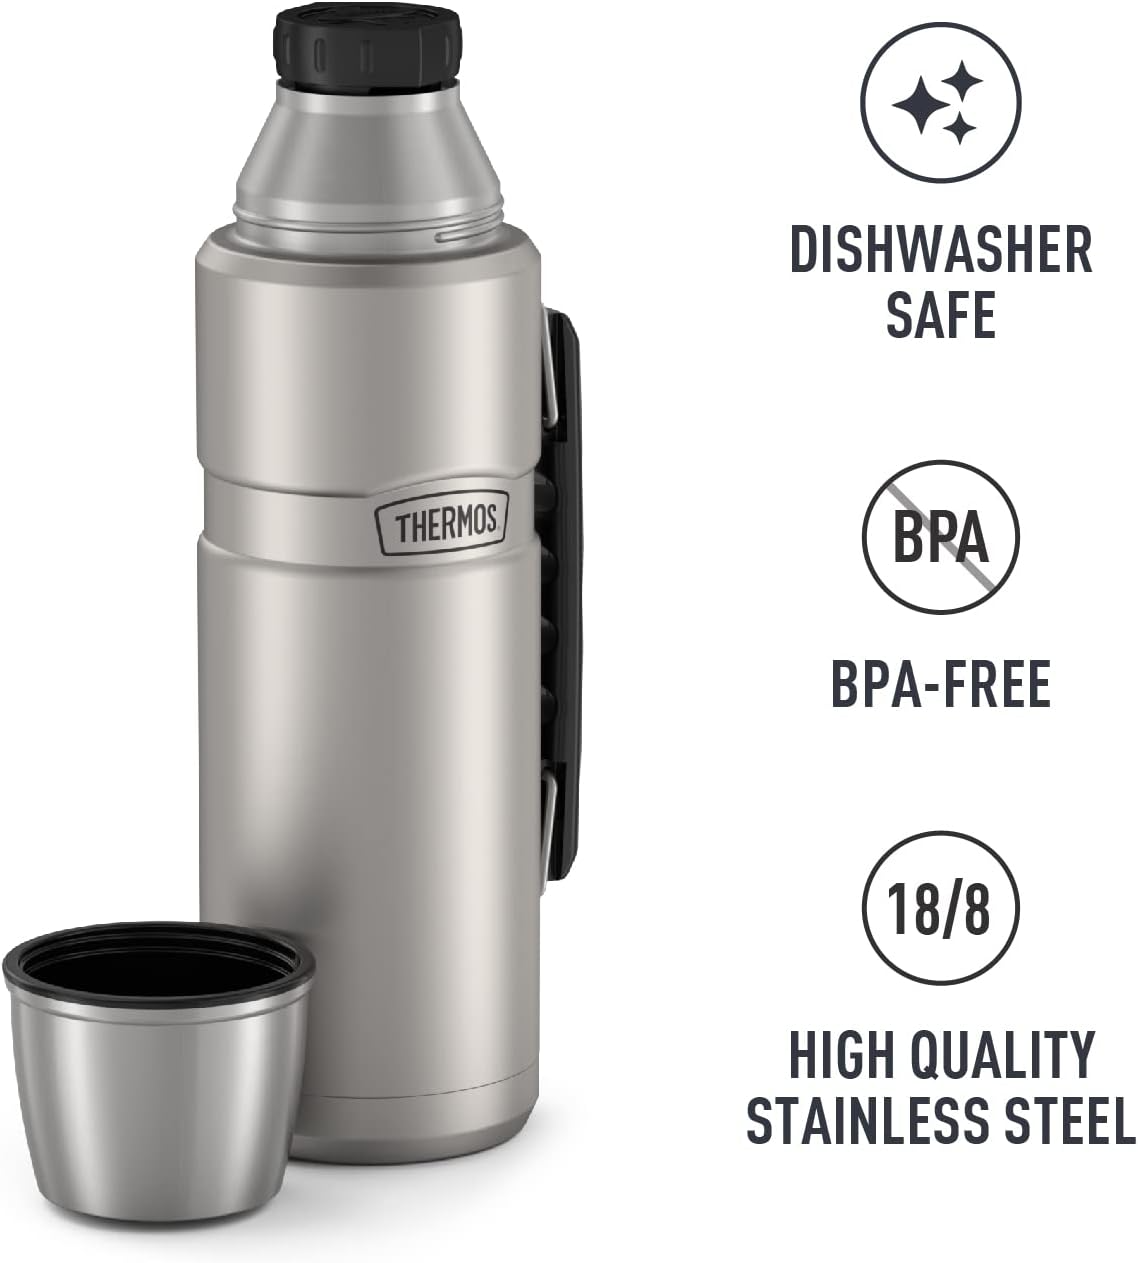
How to Make the Thread of Stainless Steel Water Bottles?
You might wonder how manufacturers create the threads on a stainless steel water bottle. These threads help you twist the cap on and off with ease. The process uses special machines and follows strict standards to make sure every bottle works perfectly.
First, you see that factories use threading machines designed for metal. These machines roll or cut the threads onto the neck of the bottle. The threading machine positions the bottle so the threads line up exactly where they need to be. Workers set the machine to match the thread pitch and depth, often using ISO metric standards. This step ensures that every cap fits tightly and seals the bottle.
Here is a simple overview of the main steps:
-
Place the bottle in the threading machine.
-
Adjust the machine for the correct thread pitch and depth.
-
Roll or cut the threads onto the neck using the machine.
-
Inspect the threads to make sure they meet quality standards.
You can see the process in this table:
|
Step |
Description |
|---|---|
|
Positioning |
Secure the bottle in the threading machine |
|
Setting Parameters |
Choose thread pitch and depth (ISO metric) |
|
Threading |
Roll or cut threads onto the neck |
|
Inspection |
Check threads for accuracy and smoothness |
Manufacturers use thread rolling because it creates strong, smooth threads. This method also protects the bottle from damage. You get a bottle that lasts longer and keeps your drink fresh. When you choose a stainless steel bottle, you benefit from precise engineering and careful quality checks.
If you want to see how threads look, here is a simple code example:
Thread Pitch: 2.0 mm
Thread Depth: 1.2 mm
Standard: ISO Metric
You can trust that your bottle will seal tightly every time you twist on the cap.
Custom Neck & Cap Design
You may want a water bottle that stands out from the rest. Custom neck and cap designs help you create a unique look and feel. You can choose special shapes, colors, or finishes for your bottle. These choices let you match your brand or personal style.
Custom designs can change the way your bottle works. You might want a wider neck for easy filling or a special grip for better handling. Some people add logos or patterns to make their bottle easy to spot. You can also pick different materials for the neck or cap to improve strength or appearance.
Customizing your bottle affects both cost and production time. Here is a table that shows how different options can change the price per unit:
|
Customization Type |
Cost Range (per unit) |
|---|---|
|
Logo Printing |
$0.50 to $2 |
|
Custom Colors or Finishes |
$0.30 to $1 |
|
Engraving or Embossing |
$1 to $3 |
|
Packaging Customization |
$0.50 to $2 |
You should know that more complex designs often need new molds and tooling. This step can add time and cost to your project. You also need to approve the design before production starts. Most companies will make a sample for you to check before making a large batch.
Here are the main steps in the custom design process:
-
Base cost per unit depends on the type of bottle you choose. This can range from $1 to $20.
-
Customization costs add to the base price. Features like logo printing or special packaging can add $0.50 to $2 per unit.
